SAIL MAKING
The first Mk2's we built had a sail areaa of 2500sq cm and this restriction was fairly loosely policed. At that time we used sail blocks to get the necessary shape into the sails. As we progressed in developing a full sized 3 dimensional sail mould for both main and jib it was mutually decided to change the main area to jib area relationship. further on in this area of the web site we discuss the making of the moulds and the construction of sails using those moulds.
SAIL SHAPE
There are a number of ways to put shape into a sail so that is more efficient than a flat sheet in converting wind energy into forward motion of a yacht.
- Luff curve - the luff of a sail is shaped so that when held straight by the mast or the forestay in the case of a Jib, the sail is forced into a curved shape luff to leach. For our Mk2 Nip we have no mast track, its just a length to 8 mm carbon tube so holding the main luff straight enough to form a good shape is not an option. Luff curve worked on the original Nip because the main was held to the mast with a full length pocket and the luff curve was formed between the pocket and the sail proper. When on the mast the sail shape was forced in by a straight mast.
- Seam Taper - an efficient sail shape can be formed in a sail made of a number of panels, by shaping the panels top and bottom so that when all panels are joined with their seams overlapping parallel, the effect is to distort the flat nature of each panel into a sail that is curved both from luff to leach and from foot to head. This method has been successful in full size yacht and skiff sails for a long time, there is however one small problem with using it for model sails. In a full sized sail the amount of curve in the top or bottom of a panel may be measured in centimeters, in a model yacht sail however it is measured in parts of a millimeter and making a neat parallel join to such accuracy is virtually impossible.
On his most informative web page www.onemetre.net, Lester Gillbert shows how the use of a very cleverly shaped block of wood can be used to achieve seam taper in model yachts. We have taken Lester's idea one step further, his block determines a fixed angle between the panels. This limitation requires a number of different blocks to achieve differing angles between panels. In the photos below the two halves of a block are joined with a hinge, the angle between panels is adjusted by packing the top (or bottom) of the joint to a known width. In our use of these blocks on the first occasion it was necessary to make a number of trial sails from copy paper to view the effect of differing angles on the shape of the sail. One set of blocks has an airfoil shape the other a circular shape - some of our members have their preferences on what to use where (main or jib or both)
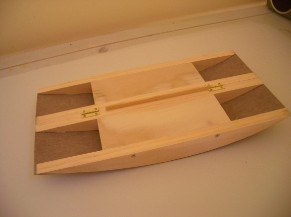
Sail Blocks are made with a pine frame and covered with 'formica' On the underside are two small brass hinges

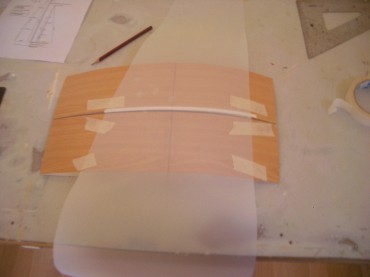
To use these blocks one cloth panel is laid across one block with the premarked position of the maximum chord line on the panel matching the maximum chord line on the blocks. A length of 6mm double sided tape is added to the edge of the cloth. Don't remove the paper covering from the tape. The second panel is placed over the first just covering the tape. Lift the top edge of the overlapping panel and peel back a small amount of the paper covering on the tape. Pull it to the side and at the same time ease down the cloth over the exposed sticky surface.
This process is continued until all panels are joined to make a sail.
The angle between the two curved surfaces gives the correct angle to the maximum cord line of the sail.
The seam taper process made easy with a photo
It might seem a bit of a challenge but if your doing it for one class in a club or group some monitory saving and some satisfaction can be achieved by making a full size sail mould. Such a mould doesn't give you the flexibility to easily change the sail shape parameters but for a one class club, every sailor having similar shaped and sized sails can be an advantage.
In our group we had spent some time perfecting (well almost) the shape of a decent set of Nip sails using our blocks. It was only then necessary to take a lot of measurements of our 'model sail' to draw up the shape of our full size moulds. They have a base of MDF and 'wing like' ribs of thin pine. The surfaces are covered in panels of 'formica' glued and sometimes screwed to the ribs. We have changed a little from the tradition of having the seams at right angles to the leach. Something that was to do with woven cloth stretch. We have found that a far more acute angle of seam to leach gives a longer seam and allows the taper to be spread over a longer length.
Details of the moulds are:

|
Mould Drawings.pdf Size : 61.319 Kb Type : pdf |
You will see in the drawings we have chosen a circular section for the main and an aerofoil for the jib. Comments from experienced sailmakers about our choices are more than welcome - please email.
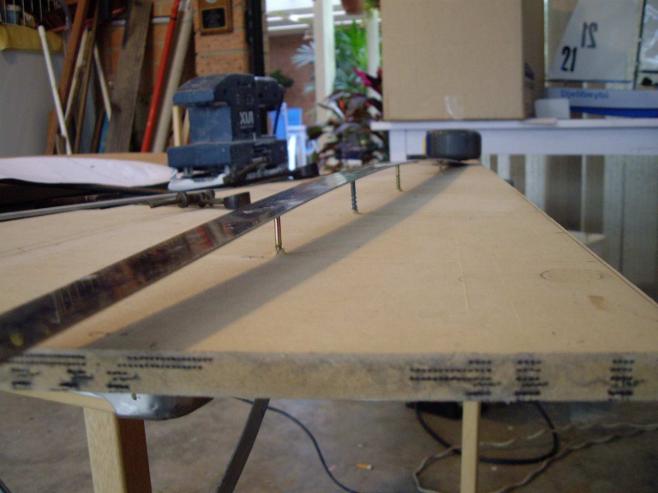
One of the most important mould building stages is to get the maximum chord depth line looking good. Regardless of the cambers you have chosen for each seam a smooth maximum chord line is essential. Put in some temporary screws to a height you have chosen for each seam. As in the photos lay a straight edge along the tops and wind up and down each screw to get a smooth curve. After this stage you may have to make some slight adjustments to each rib profile so they match the line of the straight edge.